
First things first, you will need:
- Your body and a tape measurer
- A ruler, preferably a long one such as a meter stick, pattern master or set triangle
- Pattern cutting paper or large pad of paper or several sheets of printer paper taped together. Your paper should be 5cm wider than half your bust measurement.
- Pencils and rubber
- A french curve, specifically one designed for creating curves like armholes and necklines
I work in CM, so these measurements will be in metric.
OK, let's begin...
Step 1: Mark Your Origin. Orient your paper in landscape orientation, or with the longest dimension running horizontally in front of you. Mark a point in the upper left hand corner about 1cm from either edge of the paper. This is your origin point, your home base, and all your measurements and lines are going to be based on this point. Mark this point O.
Step 2: Square Off. From your origin point O, measure down 1.5cm parallel to the vertical edge of the paper and draw a line to that point. Mark that point A.
Step 3: Armscye Depth. From point A, you will now measure down the armscye depth plus 0.5cm. The armscye is half the circumference of the arm at the shoulder joint. Mark the end point B.
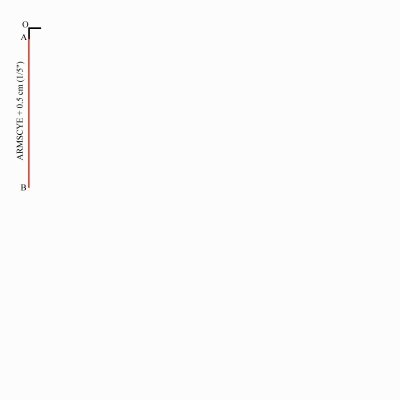 |
| Armscye depth |
* If you need to estimate the armscye depth, you can get it from the bust measurement. Metric (bust -> armscye): 76cm-> 19.8cm, 80cm -> 20.2cm, 84cm -> 20.6cm, 88cm-> 21cm, 92cm -> 21.4cm, 96cm -> 21.8cm, 100cm -> 22.2cm, 104cm -> 22.6, 108cm -> 23cm, 112cm -> 23.4cm, 116cm -> 23.8cm, 120cm -> 24.2cm. For each 4cm above 120cm, add 0.4cm to armscye*
Step4: Bust Width. From point B, draw a line perpendicular to line AB. This line will be half the length of the bust measurement plus 5cm. Mark the end point of that line C.
Step4: Bust Width. From point B, draw a line perpendicular to line AB. This line will be half the length of the bust measurement plus 5cm. Mark the end point of that line C.
Step 5: Drawing upwards from point C, draw a line parallel to line OB, for the same distance as the length of OB. If your bust measurement is 92cm or below, mark this point D. For bust sizes above 92cm, get out your calculator- you’re going to add 1/8th of the distance above 92cm. For example, someone with a 100cm bust measurement is 8cm above 92cm. 1/8th of 8cm is 1cm. Add this amount to the line you just drew off of point C, and mark the endpoint D. Draw a light line connecting points D and O. You’ll be erasing this line later.
 |
| Measure upwards from point C |
Step 6: Return to Point O. Drawing straight down again from point O, parallel to the vertical edge of the paper, mark the distance from the nape of the neck to the waist. I have a trick for finding the nape of my neck: Tip your head back as far as it will go, and rest two fingers on your neck where the back of the head and the back of the neck meet. Don’t force them into the crevice, just rest them there so that the tops of your fingers are touching your head and the bottoms are on your neck. Lift your head again, and your middle finger will be on your nape. The waist is the smallest point of the torso, and can be found by tying a narrow strip of elastic snuggly around your waist and bending your body- the elastic will roll to the narrowest part of your torso, your waist. Measure along the spine between these two points. Mark the endpoint of this new line point E.
*If you need to estimate the nape to waist measurement, you can get it from the bust measurement. Add or subtract 0.4cm to 41cm for each 4cm of bust above or below 88cm e.g. for a 100cm bust, you will add 1.2cm to 41cm and arrive at 42.2cm*
Step 7: Square off as shown below. Mark the corner point F.
 |
| Square off |
Step 8: The Neck. Go back to point O, and measure across 1/5th of the neck measurement (taken around the neck at the nape) minus 0.2cm. Mark this point G. You need not connect points O and G, but if you choose to, draw the line lightly, as it will need to be erased later.
*If you need to estimate the neck measurement, you can get it from the bust measurement. Add or subtract 1cm to 37cm for every 4cm increment above or below 88cm and make a note of the measurement*
*If you need to estimate the neck measurement, you can get it from the bust measurement. Add or subtract 1cm to 37cm for every 4cm increment above or below 88cm and make a note of the measurement*
Step 9: Using the French Curve, draw a shallow curve from points A to G. This is your back neckline edge.
 |
| Constructing the back neck edge |
Step 10: Returning to Point A. Measure down from point A 1/5th of the armscye measurement minus 0.7cm. Mark this point H. From Point H, draw a line perpendicular to the line OB that is half the distance of line BC (see illustration below).
Step 11: Shoulder Measurement. The shoulder measurement is somewhat tricky to get; you will probably need a second set of hands to help you out. To measure the shoulders, stretch the measuring tape from the base of neck to shoulder bone. Make a note of the measurement, as you will need it later. Now, with your ruler zeroed on point G, pivot your ruler until the distance you need to mark (Shoulder Measurement + 1cm) intersects with the line your drew in Step 10. Mark the intersection point I. (If you find that Line H is too short to accommodate your shoulder measurement, go ahead and extend line H out to fit. Remember, this sort of thing is based on averages and the “average” body structure, but in reality, not everyone conforms to that average).
*If you need to estimate the shoulder measurement, you can get it from the bust measurement. Add or subtract 0.25cm to 12.25cm for each 4cm of bust increment above or below 88cm. Shoulder measurements vary a lot from one individual to another*
*If you need to estimate the shoulder measurement, you can get it from the bust measurement. Add or subtract 0.25cm to 12.25cm for each 4cm of bust increment above or below 88cm. Shoulder measurements vary a lot from one individual to another*
 |
| Constructing the back shoulder |
Step 12: Find the Point halfway between points G and I. Mark that point J. From point J, measure 5cm down and 1cm to the left. Mark this point K. Point K is the end of the shoulder dart.
Step 13: From Point K, draw two diagonal lines up to line GI. They should intersect with the line 1cm apart, and the lines should be of equal length.
 |
| The back shoulder dart |
Step 14: Back Measurement. From point B, measure and mark half the back measurement plus 0.5cm along the line BC. An easy way to obtain the back measurement is to put on a fitted t-shirt and measure across the back from armscye seam to armscye seam at the narrowest point (across the shoulder blades). Mark this point L.
*If you need to estimate the back measurement, you can get it from the bust measurement. Add or subtract 1cm to 34.4cm for each bust increment of 4cm above or below 88cm. The back measurement is usually significantly smaller than half the bust measurement so therefore it should be measured separately*
*If you need to estimate the back measurement, you can get it from the bust measurement. Add or subtract 1cm to 34.4cm for each bust increment of 4cm above or below 88cm. The back measurement is usually significantly smaller than half the bust measurement so therefore it should be measured separately*
Step 15: Square up from point L to the line HI. Mark the intersection point M. Be sure to pencil in this line lightly, as you’ll be erasing it later on.
 |
| Square off |
Step 16: Find the point halfway between L and M. Mark this point N. Also, find the point halfway between B and L. Mark this point P. Measure the distance between B and P, and mark this distance along the horizontal line from point E. Mark the end point Q. Draw a dashed line from Point P to Point Q.
Step 17: Moving to the Other Side, measure 1/5th of the neck measurement plus 0.7cm from point D, along the line DO. Mark this new point R.
 |
| Constructing the front neck |
Step 18: Measure Down from point D 1/5th of the neck measurement minus 0.2cm. Mark this point S.
Step 19: Using your French Curve, draw a deep curved line from point R to point S. This is the front neckline edge.
 |
| Front neckline edge |
Step 20: Bust Dart. From point C, measure towards point B the distance on 1/2 the Chest measurement plus 1/2 the dart size. Mark that Point T. This part can get a little tricky. To obtain the chest measurement, subtract the back measurement from the bust measurement.
The dart size is not actually a measurement, but it is scaled with the bust size.
*If you need to estimate the chest measurement, you can get it from the bust measurement. Add or subtract 1.2cm to 32.4cm for each 4cm of bust increment above or below 88cm. The chest measurement may vary quite a lot from the estimate, therefore it is advisable to measure this separately*
*To find your dart size, start with a 7cm dart and add or subtract 0.6cm to it for every 4cm of bust increment above or below 88cm, e.g. a 100cm bust has a 8.8cm dart, while a 84cm bust has a 6.4cm dart. Make note of your dart size*
Draw a vertical line up from point T to just below line HI.
Step 21: Find the Halfway Point between points C and T. Mark this point U. This can also be found by measuring the distance between the center of your breasts from bustpoint to bustpoint (nipple to nipple) and dividing measurement by 2. Draw a dashed vertical line downward to intersect with line EF. Mark the intersection point V. This is the mid front line.
 |
| The mid-front line |
Step 22: Mark the Bust Point 2.5cm below point U. Mark this point BP.
Step 23: Using the Dart Size from step 20, measure from point R along the line DO. Mark the resulting point W. Now draw a line from point R to the Bust Point (BP), and from point BP to point W. These are the sides of your bust dart.
 |
| The bust dart |
Step 24: Shift Your Attention to the construction line passing through points H, M, and I. Measure down 1.5cm and lightly draw in a new construction line, parallel to the first, across the middle of the block.
Step 25: Repeat the Pivoting Motion we did in step 11. Zero your ruler on point W and pivot the ruler until it crosses the construction line at the distance of the shoulder measurement. Mark this intersection point X.
 |
| Constructing the front shoulder |
Step 26: Measure Upwards 1/3 of the armscye depth measurement from point T and mark that point Y. Find the halfway point between points L and T. Mark that point Z. Draw a dashed vertical line down from point Z until it intersects the waistline (line EF), and mark that intersection point AA.
 |
| Find the half way point/side seam |
Step 27: Draw A Small Diagonal inward-pointing line from Point L and Point T. The length of that line will vary depending on your bust size.

Step 28: Using your French Curve, draw in the armscye curve so that it passes smoothly through the construction points I-M-L Segment-Z-T Segment-Y-X.
 |
| Drawing in the armscye |
Step 29: Extend the line DF downwards by 0.5 - 1.5cm, depending on your bust measurement (0.5cm for small, 1.0cm for intermediate, 1.5cm for large). Mark the end point AB. Draw a line from AB to E. This ensures that the waist remains horizontal and doesn’t ride up.
 |
| Extending the waistline |
Step 30: Draw in Darts around each of the dashed lines that extend from the lower boundary of the block (line AB to E) to the line BC. At the end of this, what’s left of line E AB should measure out to ((Bust Measurement +3) + (Waist Measurement + 6)) /2. For example, if you’re working with an 88cm bust and a 65cm waist, the math should go as follows
(88+3) + (65+6) /2
88+3=91 65+6=71
91-71=20 (This is the amount that needs to be taken out in darts all around the waist)
20/2= 10 (This is how much we need to take out in darts on the pattern as we are working on half the bodice)
91-71=20 (This is the amount that needs to be taken out in darts all around the waist)
20/2= 10 (This is how much we need to take out in darts on the pattern as we are working on half the bodice)
Dividing up the darts as evenly as possible, we get Back=3cm, Side=3cm, Front=4cm
 |
| Drawing in the waist darts |
Step 31: Redraw Your Block outline and cut along these lines to get the final, close-fitting basic bodice block!
 |
| The final bodice block!
(These instructions are taken from Gedwoods of Burdastyle.com. I have simply rewritten them for ease of reading).
|
No comments:
Post a Comment