
* Pattern cutters often prefer to use this method as pivoting is often the quicker and
cleaner method, but cannot be used for all styles.
* When pivoting, it's important to remember that the CF (center front) and CB (center back)
should remain on the grain (unless moving darts into these positions).
Note***
When using the pivoting method on the front bodice, the bust point is used as the pivot point and then the new dart is then redrawn to the bust arc (see here).
As an example, I will show you how to transfer the shoulder dart to the underarm.
1. Mark a new point (site mark) on the block, where you want the new dart to be.
2. Decide which area of the block that won't be affected by the repositioning of the dart and mark around this area. In this case it is from the shoulder dart leg to the new dart position.

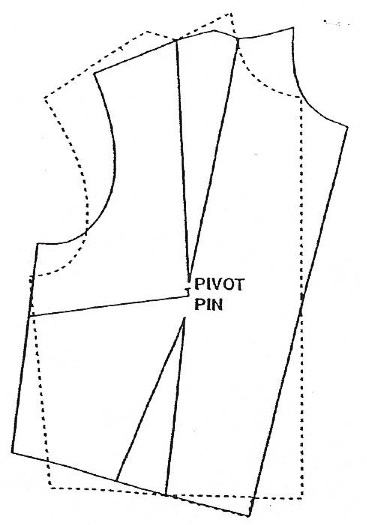
3. Using a pivot pin or awl at the bust point, pivot the block to close the unwanted dart.
4. Mark in the remaining section from the site mark to the closed dart.

5. Remove the block and mark in the existing waist dart.
6. Mark the position of the new dart to the bust arc, fold and shape the dart end.
 Other examples...
Mid neck dart


 Ok, so the easiest way to do this is to work on each new dart seperately. So on that note, we will start off with closing the shoulder dart and opening it up in the armhole. We first need to draw around the parts of the block that will not be altered when you have moved the darts... this comes down to dart analysis. In this instance, the parts that won't move/change (bright red line) are:
* from the shoulder dart leg (one closest to the neck- A), through the center front and to the waist dart
leg (one closest to the center front- B).
* from new dart position (E) to the other new dart position (D).
If you remember from picture 1, the shoulder dart is pivoted in the direction of left-right to close it and this will automatically open up the dart in the armhole (E). The dark red section is the shape of the bodice once the shoulder dart has been closed and the new dart (E) has been opened. You don't need to draw in the purple line, this is just here to illustrate what the block looks like when you pivot it, but we don't actually use this line.


1. Mark a new point (site mark) on the block, where you want the new dart to be.
2. Decide which area of the block that won't be affected by the repositioning of the dart and mark around this area. In this case it is from the shoulder dart leg to the new dart position.
3. Using a pivot pin or awl at the bust point, pivot the block to close the unwanted dart.
4. Mark in the remaining section from the site mark to the closed dart.
5. Remove the block and mark in the existing waist dart.
6. Mark the position of the new dart to the bust arc, fold and shape the dart end.

Mid neck dart
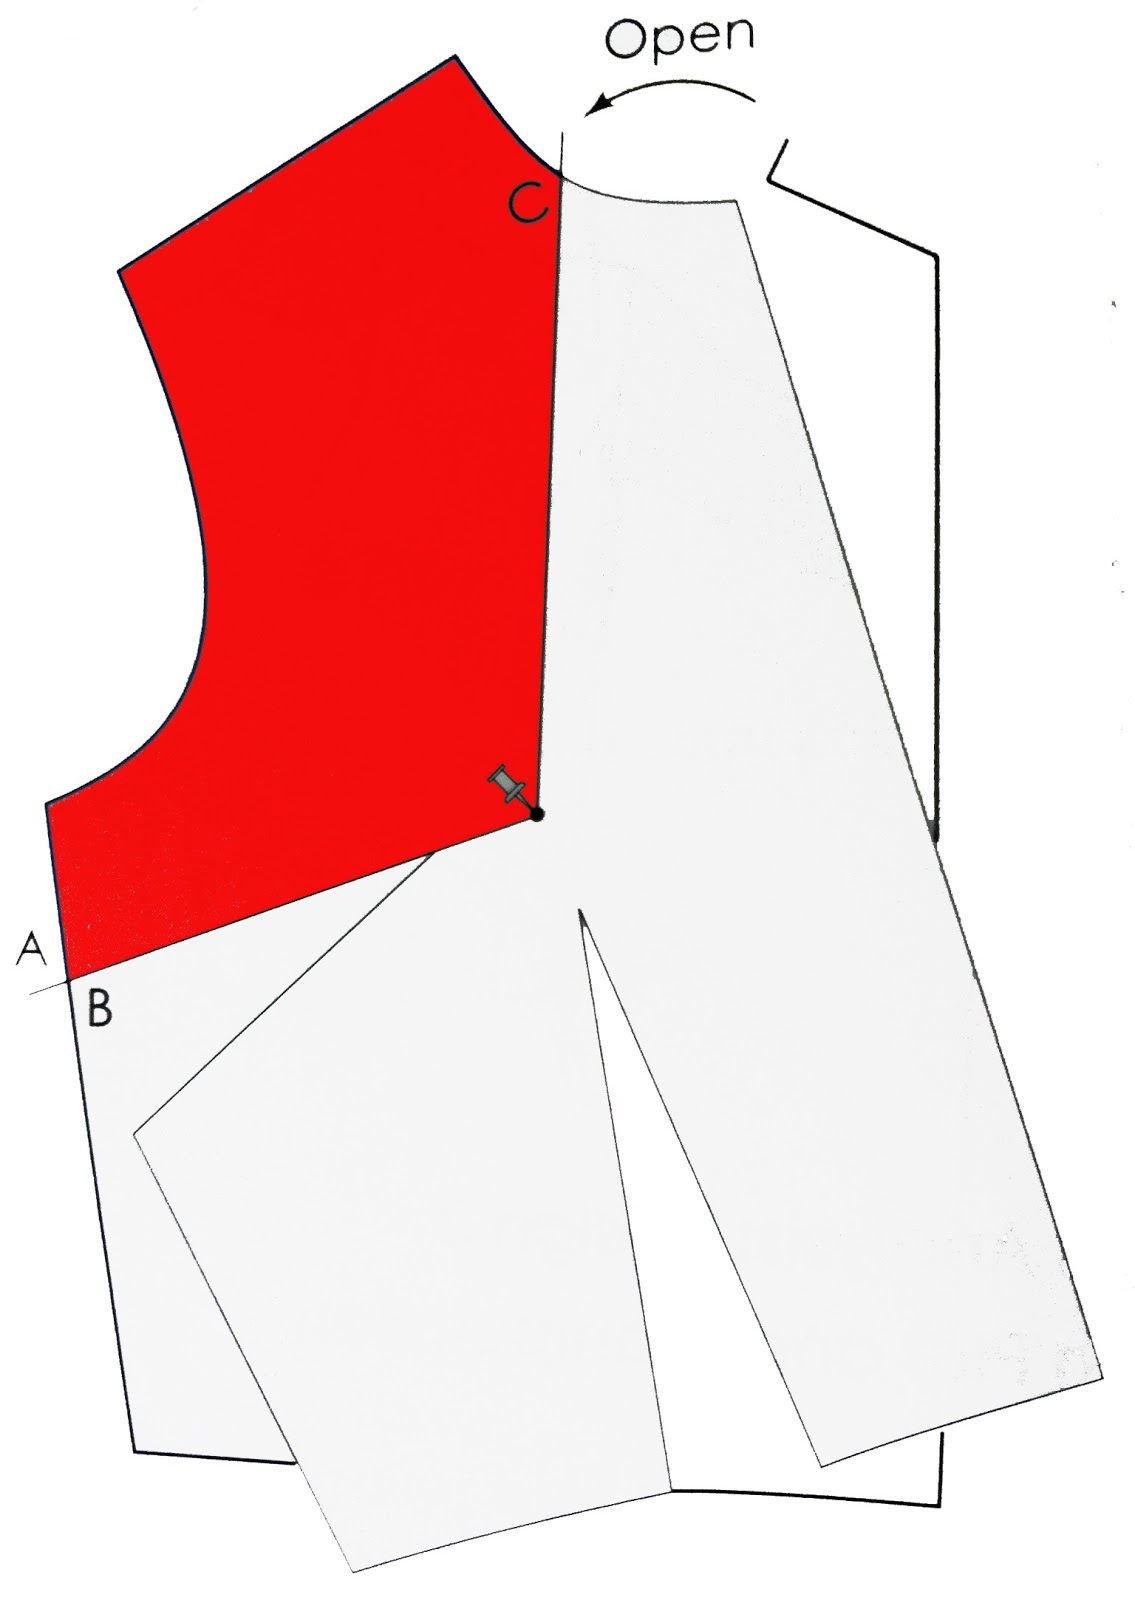
Mark new dart position at neck (C). Trace the Pivot pattern until dart leg B touches A on paper
section of pattern from dart leg A to C (red area- (this closes the waist dart and opens space for
this is the section of the pattern that won't change the mid neck dart). Trace the remaining part of
or be altered by the repositioning of the new dart). the pattern from dart leg B to point C (red area).
Remember, when the pattern is pivoted, it will
overlay the previously traced pattern section.
This is a natural occurrence. Once a section of
the pattern is traced, it isn't traced again.
Remove the working pattern from paper and draw dart
legs to bust point. Center the dart 1.5cm-2cm from the
bust point and redraw the dart legs to the new dart point. This
diagram shows what the bodice will look like once seam
allowance has been added. When working with big darts,
it is often quite common to turn the dart into a seam. as to
not make the fabric too bulky.
Shoulder tip dart


Pivoting with 2 darts
If you want to learn the pivotal method using two darts legs, lets look at the below example. The block originally has a side dart and a waist dart. We are going to keep the waist dart but instead of having a side dart, we now want a mid neck dart.
Pivoting with 2 NEW darts
And for a more advanced challenge.... let's use the 2 dart pivoting method... BUT... lets create two completely new darts! Don't worry, once you get the hang of the above methods, this will be a piece of cake!
So... I'm going to move the shoulder dart into the armhole and move the waist dart into the side seam (french dart). Remember BP stands for bust point.

This is what your two dart block looks like and the two little red markings are where you want your two new darts to be (E & D). The red arrows indicate the direction in which you will be pivoting to close the original darts and create the new ones.

* from the shoulder dart leg (one closest to the neck- A), through the center front and to the waist dart
leg (one closest to the center front- B).
* from new dart position (E) to the other new dart position (D).
If you remember from picture 1, the shoulder dart is pivoted in the direction of left-right to close it and this will automatically open up the dart in the armhole (E). The dark red section is the shape of the bodice once the shoulder dart has been closed and the new dart (E) has been opened. You don't need to draw in the purple line, this is just here to illustrate what the block looks like when you pivot it, but we don't actually use this line.

Again, looking at picture 1, you will see that the waist dart is pivoted in the direction of left-right to close it and this will automatically open up the dart in the sideseam (D). The dark red section is the shape of the bodice once the waist dart has been closed and the new dart (D) has been opened. Again, you don't need to draw in the purple line, this is just here to illustrate what the block looks like when you pivot it, but we don't actually use this line either.
And voila! This is what the finished bodice will look like. You can apply this method to any dart position... just remember that the first stage is to draw around the parts of the block that won't be altered/moved by manipulating the darts. The arrows are shown to indicate the direction of the dart fold when sewing. Oh and one last thing... don't forget to pull back your dart points slightly (1.5cm - 2cm) away from the bustpoint, otherwise you'll end up with pointy boobs!
I hope you found this tutorial helpful. Feel free to ask any questions if needed.
If you want to learn more about the slashing method, click here.
OMG I've been looking everywhere for a great tutorial on pivoting darts, this is brilliant. It's really easy to follow and understand. Thank you so much. Daniella x
ReplyDeleteThanks Daniella, that means a lot... glad you found it useful and easy to follow. xx
DeleteThank you. This information was just wonderful and has helped me heaps.
ReplyDeleteTHANKS A TON Rolana... I cant explain how much this post has helped. In fact the entire dart manipulation series has rescued me.
ReplyDeleteGreat Tutorial girl...
Thanks once again.
platinumdivinity.blogspot.in
Could you advise on how to pivot the dart so that it comes down almost to the centre front? I need to make a corset type bodice, with three panels on either side of the centre, but all pointing towards the centre?
ReplyDelete